Sorter transformation in Informatica is an active transformation and can be used to sort data in ascending or descending order. By default it sorts in Ascending order. We can use this just like SQL order by clause. We can specify whether the output rows should be distinct or not. If we specify distinct property, it sorts all ports data and removes duplicate and then becomes active. If we want to sort, need to specify sort key port based on which port we want to sort. It also removes duplicate rows with DISTINCT property.
In this Informatica tutorial, we are going to create Sorter Transformation in Informtica to sort data based on city in ascending order after calculating full name along with date data type conversion.
Creating Sorter Transformation in Informatica
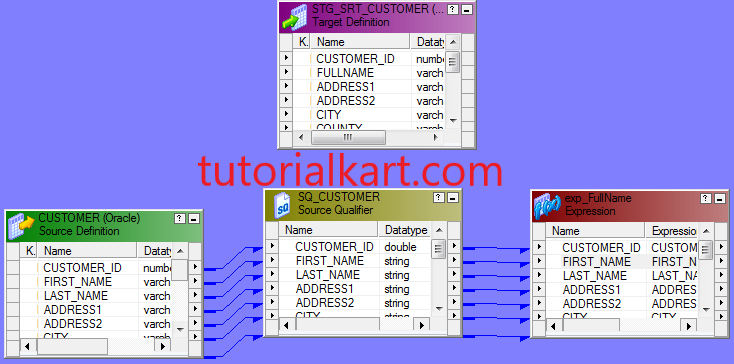
In this Transformation, we are going to use Customer table as Source table and Stg_SRT_Customer table as Target table. To create and execute any Transformation in Informatica follow the steps given below.
- What is requirement(scenario)?
- Where do we have source table?
- Where do we have target table?
- How to get source table structure into Source analyzer with ODBC?
- How to get target table structure into Target designer with ODBC?
- How to create mapping in mapping designer?
- How to create session?
- How to create Informatica level connections in workflow manager level?
- How to assign above connections inside session to source and target?
- How to create workflow and assign session?
- How execute workflow?
- How to see status of completed session in Workflow monitor level?
Sorter Transformation details & Logic
| Source Table | Transformations | Logic | Target Table |
|---|---|---|---|
| Customer | SQ_CUSTOMER | N/A | Stg_SRT_Customer |
| Customer | Exp_FULLNAME | FIRST_NAME || LAST_NAMETo_date(creation_date, ’dd.mm.yyyy’)To_date(Last_update_date, ’dd.mm.yyyy’) | Stg_SRT_Customer |
| Customer | SRT_CITY | Enable ‘Key’ port for ‘CITY’ port in ‘ASCENDING’order | Stg_SRT_Customer |
- Mapping Name: m_<Target Table Name>
- Session Name: s_<mapping name>
- Workflow Name: wf_<mapping Name>
Sorter Transformation in Informatica
- Import source and target tables into Designer
- Create mapping with name ‘m_Stg_srt_Customer.
- Drag source and target tables to the mapping designer.
- Create transformation type Expression transformation with name ‘Exp_FullName’, drag all ports from sq_customer’ to ‘Exp_FullName’.
- Double click on Expression transformation and goto ‘Ports’ tab and click on ‘add a new port to this transformation’ icon on the right side of transformation.
- Disable input pot type by checking the check box for this newly created port and provide appropriate data type and length with name full_name. Click on ‘Expression’ on the right side to this port and provide the following logic.
FIRST_NAME || LAST_NAME
Same way create two more extra another columns for to convert string date values to date values as
to_date(substr(CREATION_DATE,1,10),'dd.mm.yyyy')
to_date(substr(LAST_UPDATE_DATE,1,10),'dd.mm.yyyy')
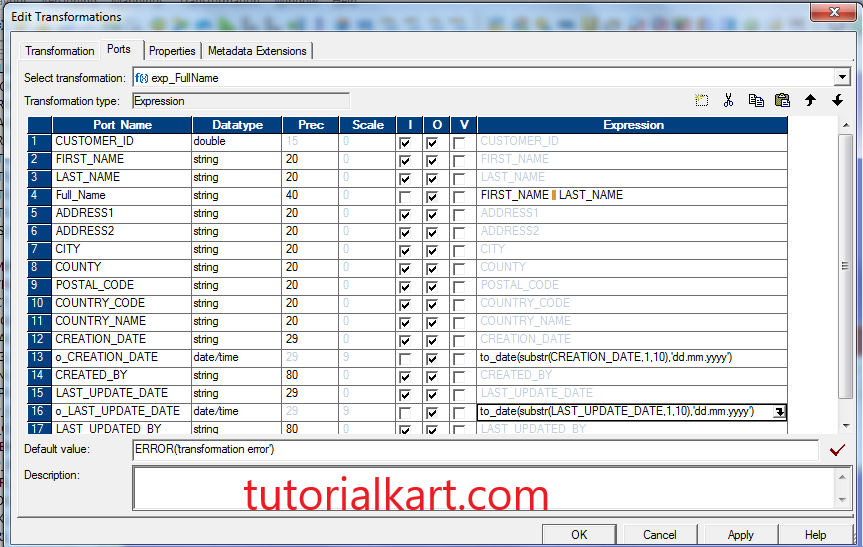
- Click on ‘Validate’,’Ok’,’apply’ and ‘ok’.
- Create Transformation type ‘Sorter’ with name ‘SRT_CITY’.
- Drag all ports from ‘Exp_FullName’ transformation to the ‘sorter’ transformation.
- Double click on ‘SRT_CITY’ and ENABLE the KEY port for CITY port and leave default sorting order.(ASCENDING)
- Click ‘apply’ and ‘OK’.
- Drag all ports from ‘SRT_CITY’ transformation to Target table ‘Stg_SRT_CUSOMER’.
- Goto repository menu and click on ‘save’.
Session Creation
- Go to tools menu from ‘Informatica designer client’ and click on ‘WORKFLOW MANAGER’.
- Go to tools menu in the ‘workflow manager’ and click on ‘tasks’ menu and click on ‘create’.
- ‘Select the task type to create’ as ‘session’, provide the name( s_<mapping name>) and click on create.
- Select the corresponding mapping for that session and ‘OK’.
- Click on ‘Done’.
- Double click on session, go to ‘mapping’ tab and click on ‘sources’ from the left pane.
- Provide the relational read connection value as ‘SRC_READ’ for source tables.
- Same click on ‘targets’ from the left pane and provide the relational write connection value as ‘TGT_WRITE’ for target tables.
- Click on apply and OK.
- Go to repository menu and click on ‘save’.
Workflow Creation
- Go to tools menu in the ‘workflow manager’ and click on ‘workflows’ menu and click on ‘create’.
- Provide the name as wf_<mapping name>.
- Drag the corresponding session.
- Go to ‘tasks’ menu and click on ‘link task’.
- Give the link connection from workflow start button to session.
- Go to repository menu and click on ‘save’.
Start Workflow
- Go to ‘workflows’ menu and click on ‘Start Workflow’.
Monitor The Workflow Status
- Go to tools menu in the ‘workflow manager’ and click on ‘workflow monitor’ menu.
- Got respective folder and observe the status.