HTML <datalist> Tag
The HTML <datalist> tag is used to provide a list of predefined options for an <input> element. It enhances user input by offering suggestions while allowing the user to enter custom values. This is especially useful for autocomplete features, improving usability and accuracy in form inputs.

The <datalist> tag works by linking to an <input> element through the list attribute. Each option in the datalist is defined using the <option> tag.
Basic Syntax of <datalist> Tag
The basic structure of the <datalist> tag is:
<input list="id-of-datalist">
<datalist id="id-of-datalist">
    <option value="Option 1">
    <option value="Option 2">
    <option value="Option 3">
</datalist>
Attributes of <datalist> Tag
- id: A required attribute that links the
<datalist>to an<input>element via the input’slistattribute.
Basic Example of HTML <datalist> Tag
Here’s an example of using the <datalist> tag to provide a list of suggestions for a text input:
index.html
<!DOCTYPE html>
<html>
    <body>
        <h2>Datalist Example</h2>
        <label for="browser">Choose a browser:</label>
        <input list="browsers" id="browser" name="browser">

        <datalist id="browsers">
            <option value="Google Chrome">
            <option value="Mozilla Firefox">
            <option value="Safari">
            <option value="Microsoft Edge">
            <option value="Opera">
        </datalist>
    </body>
</html>
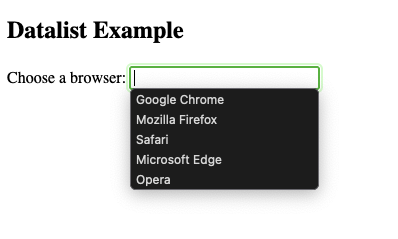
Explanation: When the user clicks on the input field or starts typing, the browser displays a dropdown with the predefined options. The user can either select one of these options or type a custom value.
When to Use the <datalist> Tag?
- Autocomplete: When you want to suggest predefined options while still allowing custom input.
- Guided Input: To guide the user towards commonly used or valid inputs without restricting them.
- Dynamic Suggestions: In combination with JavaScript, you can dynamically populate the datalist based on user interaction.
Advanced Usage of HTML <datalist> Tag
1. Dynamic Population of items in datalist with JavaScript
You can dynamically populate a <datalist> element using JavaScript:
index.html
<!DOCTYPE html>
<html>
    <body>
        <h2>Dynamic Datalist Example</h2>
        <label for="fruit">Choose a fruit:</label>
        <input list="fruits" id="fruit" name="fruit">

        <datalist id="fruits"></datalist>

        <script>
            const fruits = ["Apple", "Banana", "Cherry", "Date", "Grapes"];
            const datalist = document.getElementById("fruits");

            fruits.forEach(fruit => {
                const option = document.createElement("option");
                option.value = fruit;
                datalist.appendChild(option);
            });
        </script>
    </body>
</html>
Explanation: The JavaScript code dynamically creates <option> elements for each fruit in the array and appends them to the <datalist>.
2. Custom Validation of input against datalist
You can validate the input against the options in the datalist using JavaScript:
index.html
<!DOCTYPE html>
<html>
    <body>
        <h2>Validation with Datalist</h2>
        <label for="language">Choose a programming language:</label>
        <input list="languages" id="language" name="language">

        <datalist id="languages">
            <option value="JavaScript">
            <option value="Python">
            <option value="Java">
            <option value="C++">
        </datalist>

        <button onclick="validateInput()">Submit</button>

        <script>
            function validateInput() {
                const input = document.getElementById("language").value;
                const options = [...document.getElementById("languages").options].map(opt => opt.value);

                if (options.includes(input)) {
                    alert("Valid choice!");
                } else {
                    alert("Invalid choice. Please select from the suggestions.");
                }
            }
        </script>
    </body>
</html>
Explanation: The JavaScript function checks whether the user’s input matches one of the predefined options and provides appropriate feedback.
