HTML <dialog> Tag
The HTML <dialog> tag is used to create a dialog box or a modal window on a web page. It provides a native, semantic way to create interactive dialog elements, such as alerts, confirmations, or custom modals.

By default, the dialog box is hidden. It can be shown using JavaScript by setting its open attribute. The <dialog> tag also supports a built-in mechanism to close the dialog using the close() method.
Basic Syntax of HTML <dialog> Tag
The basic structure of the <dialog> tag is:
<dialog>
    Content of the dialog goes here.
</dialog>
The <dialog> tag remains hidden unless the open attribute is set or its visibility is controlled via JavaScript.
Attributes of HTML <dialog> Tag
- open: A boolean attribute that makes the dialog visible when present.
- Global Attributes: The
<dialog>tag supports all global attributes, such asid,class, andstyle. - Event Attributes: The
<dialog>tag supports events such asonclick,onclose, andoncancel.
Basic Example of HTML <dialog> Tag
Here’s an example demonstrating how to create a basic dialog box:
index.html
<!DOCTYPE html>
<html>
    <body>
        <h2>Basic Dialog Example</h2>
        <button id="openDialog">Open Dialog</button>

        <dialog id="myDialog">
            <p>This is a simple dialog box.</p>
            <button id="closeDialog">Close</button>
        </dialog>

        <script>
            const dialog = document.getElementById('myDialog');
            const openButton = document.getElementById('openDialog');
            const closeButton = document.getElementById('closeDialog');

            openButton.addEventListener('click', () => dialog.showModal());
            closeButton.addEventListener('click', () => dialog.close());
        </script>
    </body>
</html>
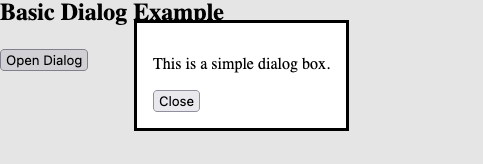
Explanation: Clicking the “Open Dialog” button calls the showModal() method, displaying the dialog box. The “Close” button calls the close() method to hide the dialog.
Using the open Attribute
You can make the dialog visible by default using the open attribute:
index.html
<!DOCTYPE html>
<html>
    <body>
        <h2>Open Attribute Example</h2>
        <dialog open>
            <p>This dialog is visible by default.</p>
        </dialog>
    </body>
</html>
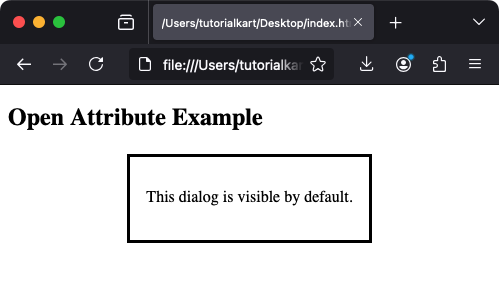
Explanation: The dialog appears immediately when the page loads because the open attribute is present.
Styling the <dialog> Tag
The <dialog> tag can be styled using CSS for a customized look:
index.html
<!DOCTYPE html>
<html>
    <head>
        <style>
            dialog {
                border: 2px solid #007BFF;
                border-radius: 10px;
                padding: 20px;
                font-family: Arial, sans-serif;
                box-shadow: 0 4px 8px rgba(0, 0, 0, 0.2);
            }

            dialog::backdrop {
                background-color: rgba(0, 0, 0, 0.5);
            }
        </style>
    </head>
    <body>
        <h2>Styled Dialog Example</h2>
        <button id="openDialog">Open Styled Dialog</button>

        <dialog id="styledDialog">
            <p>This is a styled dialog box.</p>
            <button id="closeStyledDialog">Close</button>
        </dialog>

        <script>
            const dialog = document.getElementById('styledDialog');
            const openButton = document.getElementById('openDialog');
            const closeButton = document.getElementById('closeStyledDialog');

            openButton.addEventListener('click', () => dialog.showModal());
            closeButton.addEventListener('click', () => dialog.close());
        </script>
    </body>
</html>
Explanation: This example uses CSS to style the dialog box with rounded corners, padding, and a backdrop for a modern appearance.
Advanced Example: Nested Dialogs
You can nest dialogs to create hierarchical modals:
index.html
<!DOCTYPE html>
<html>
    <body>
        <h2>Nested Dialog Example</h2>
        <button id="openOuterDialog">Open Outer Dialog</button>

        <dialog id="outerDialog">
            <p>This is the outer dialog.</p>
            <button id="openInnerDialog">Open Inner Dialog</button>
            <button id="closeOuterDialog">Close Outer Dialog</button>

            <dialog id="innerDialog">
                <p>This is the inner dialog.</p>
                <button id="closeInnerDialog">Close Inner Dialog</button>
            </dialog>
        </dialog>

        <script>
            const outerDialog = document.getElementById('outerDialog');
            const innerDialog = document.getElementById('innerDialog');
            const openOuterButton = document.getElementById('openOuterDialog');
            const openInnerButton = document.getElementById('openInnerDialog');
            const closeOuterButton = document.getElementById('closeOuterDialog');
            const closeInnerButton = document.getElementById('closeInnerDialog');

            openOuterButton.addEventListener('click', () => outerDialog.showModal());
            openInnerButton.addEventListener('click', () => innerDialog.showModal());
            closeOuterButton.addEventListener('click', () => outerDialog.close());
            closeInnerButton.addEventListener('click', () => innerDialog.close());
        </script>
    </body>
</html>
Explanation: The outer dialog opens first, and the inner dialog can be opened from within the outer dialog, creating a nested modal structure.
