HTML <label> Tag
The HTML <label> tag is used to define a label for an <input> element. It improves accessibility and usability by associating a descriptive label with a form control, such as a text field, checkbox, or radio button. When the label is clicked, it focuses or activates the corresponding input element.
The <label> tag helps users, including those relying on screen readers, understand the purpose of the input field it is associated with.
Basic Syntax of HTML <label> Tag
The basic structure of the <label> tag is:
<label for="id-of-input">Label Text</label>
<input type="type" id="id-of-input">
The for attribute of the <label> tag links it to the id of the associated <input> element.
Attributes of HTML <label> Tag
- for: Links the label to the
idof an<input>element, enabling interaction and accessibility. - Global Attributes: Supports global attributes like
id,class, andstyle. - Event Attributes: Supports event attributes like
onclick,onmouseover, andonfocus.
Basic Example of HTML <label> Tag
Here’s a simple example of using the <label> tag with a text input field:
index.html
<!DOCTYPE html>
<html>
    <body>
        <label for="username">Username:</label>
        <input type="text" id="username" name="username">
    </body>
</html>
Explanation: The <label> tag is linked to the <input> element via the for attribute. Clicking on the label focuses the input field.
Using Nested Labels
The <label> tag can also contain the input element as a child, eliminating the need for the for attribute:
index.html
<!DOCTYPE html>
<html>
    <body>
        <label>
            Email:
            <input type="email" name="email">
        </label>
    </body>
</html>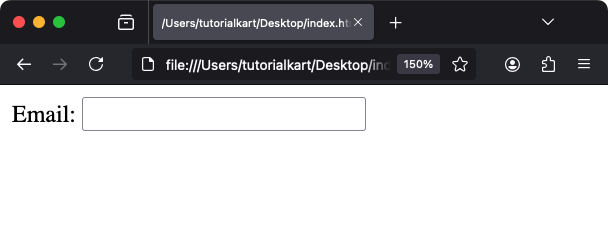
Explanation: The input field is nested inside the <label> tag, making the label automatically associated with the input field.
Example with Checkboxes and Radio Buttons
The <label> tag is often used with checkboxes and radio buttons to make them clickable:
index.html
<!DOCTYPE html>
<html>
    <body>
        <p>Select your favorite fruit:</p>

        <label for="apple">
            <input type="checkbox" id="apple" name="fruit" value="apple"> Apple
        </label><br>

        <label for="banana">
            <input type="checkbox" id="banana" name="fruit" value="banana"> Banana
        </label><br>

        <label for="orange">
            <input type="checkbox" id="orange" name="fruit" value="orange"> Orange
        </label>
    </body>
</html>
Explanation: Each label is linked to a checkbox input field using the for attribute, making the checkbox clickable when the label is clicked.
Styling the <label> Tag with CSS
You can style the <label> tag using CSS to enhance its appearance:
index.html
<!DOCTYPE html>
<html>
    <head>
        <style>
            label {
                font-size: 16px;
                font-weight: bold;
                display: block;
                margin-bottom: 5px;
                color: #333;
            }

            input {
                padding: 8px;
                width: 300px;
                border: 1px solid #ccc;
                border-radius: 4px;
            }
        </style>
    </head>
    <body>
        <label for="fullname">Full Name:</label>
        <input type="text" id="fullname" name="fullname" placeholder="Enter your full name">
    </body>
</html>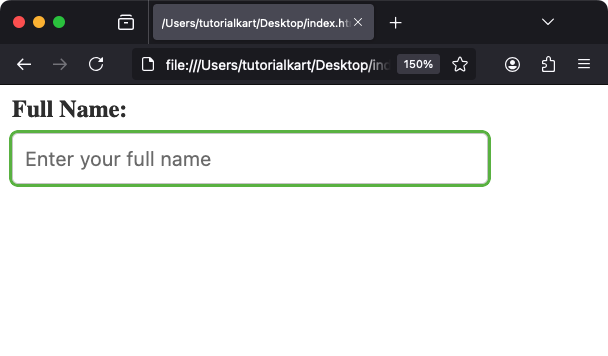
Result: The label appears bold and distinct above the input field, improving the form’s readability and user experience.
Practical Applications of the <label> Tag
- Improved Accessibility: Enhance accessibility by associating descriptive text with input fields.
- Clickable Forms: Enable users to click on labels to focus on the corresponding input field.
- Structured Forms: Organize form fields with clear and styled labels for better usability.