Writing Your First Test Case using JUnit
In this tutorial, we will guide you step by step on how to write your first test case in JUnit.
We assume that you have already set up a Maven Java project with JUnit as a dependency.
We will create a simple test case to test the functionality of a calculator’s addition method.
Step 1: Understand the Structure of a JUnit Test
A JUnit test case is a method in a class that is annotated with @Test.
The structure of a JUnit Test typically includes:
- A setup phase to initialize the objects or conditions required for testing.
- An action phase where the method to be tested is executed.
- An assertion phase to verify that the method behaves as expected.
Step 2: Create a Java Class for the Functionality
Before writing the test case, we need a method to test. Let’s create a simple calculator class with an add method:
src/main/java/Calculator.java
public class Calculator {
    public int add(int a, int b) {
        return a + b;
    }
}
Save this file in the src/main/java directory of your Maven project.
Step 3: Create a Test Class
JUnit test classes are typically stored in the src/test/java directory. Create a new class named CalculatorTest in this directory:
import static org.junit.jupiter.api.Assertions.*;
import org.junit.jupiter.api.Test;

class CalculatorTest {
}
This is the basic structure of a JUnit test class. The @Test annotation will be used to mark methods as test cases.
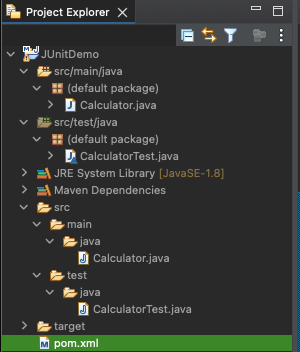
The following screenshot, shows where the Calculator.java and CalculatorTest.java have been created in our JUnitDemo project.
Step 4: Write a Test Method
Inside the test class, add a method to test the addition functionality of the calculator. Use the @Test annotation to mark it as a test case:
src/test/java/CalculatorTest.java
import static org.junit.jupiter.api.Assertions.*;
import org.junit.jupiter.api.Test;

class CalculatorTest {

    @Test
    void testAddition() {
        // Arrange: Set up the calculator and input values
        Calculator calculator = new Calculator();
        int a = 5;
        int b = 3;

        // Act: Call the method to be tested
        int result = calculator.add(a, b);

        // Assert: Verify the result
        assertEquals(8, result, "The addition of 5 and 3 should be 8");
    }
}
Explanation of the Test Case:
- Arrange: We create an instance of the
Calculatorclass and define the input values (aandb). - Act: We call the
addmethod with the inputs. - Assert: We use
assertEqualsto check if the result is as expected. If the result is incorrect, JUnit will throw an error, and the test will fail.
Step 5: Run the Test Case
To run the test case, follow these steps:
Using Eclipse IDE: Right-click on the test class in the Project Explorer, select Run As > JUnit Test. The JUnit runner will execute the test and display the result.
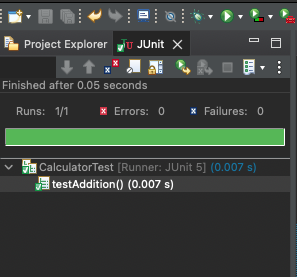
If everything is set up correctly, the test should pass, and you will see a success message, as shown in the following video.
Step 6: Verify the Results
After running the test:
- If the test passes, you’ll see a green bar in the JUnit runner or a success message in the terminal.
- If the test fails, you’ll see a red bar in the JUnit runner or an error message in the terminal, indicating the cause of the failure.
This output helps you identify and fix the issue in your code.
Conclusion
Congratulations! You’ve written and executed your first JUnit test case. By following this structured approach, you can test individual units of your code effectively. JUnit tests not only help in ensuring code correctness but also make refactoring and debugging easier.