Set Button Width in Tkinter
In Tkinter, the width option of a Button widget allows you to control its width. The width is measured in characters when using text and in pixels when using an image. The value assigned to the width option must be an integer.
To set a specific width to Button in Tkinter, pass width parameter with required number of characters length or pixels while creating the Button.
In this tutorial, we will go through examples using the width option to modify the size of a Tkinter Button.
Examples
1. Setting Button Width in Tkinter
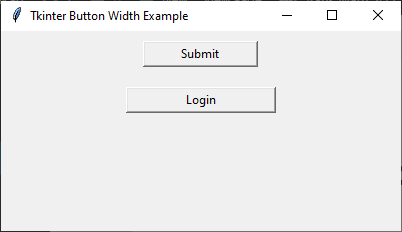
In this example, we will create a Tkinter window with buttons of different widths.
The first button will have a width of 15 characters.
tk.Button(root, text="Submit", width=15)And the second button will have a width of 20 characters.
tk.Button(root, text="Login", width=20)main.py
import tkinter as tk

# Create the main window
root = tk.Tk()
root.title("Tkinter Button Width Example")
root.geometry("400x200")

# Create buttons with different widths
btn_submit = tk.Button(root, text="Submit", width=15)
btn_submit.pack(pady=10)

btn_login = tk.Button(root, text="Login", width=20)
btn_login.pack(pady=10)

# Run the main event loop
root.mainloop()
Screenshot in macOS

Screenshot in Windows
2. Setting Button (with Image) Width in Pixels
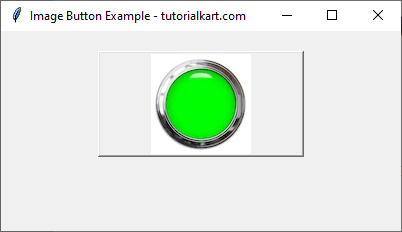
In this example, we will create a Button with image. We will set the button width to 200 pixels.
tk.Button(root, image=image, command=on_click, width=200)The actual width of the image is 100 pixels. Since we have specified a width of 200 pixels for the button, the image is placed in the center of the button.
main.py
import tkinter as tk
from tkinter import PhotoImage

root = tk.Tk()
root.title("Image Button Example - tutorialkart.com")
root.geometry("400x200")

def on_click():
    print("Image Button Clicked!")

# Load an image
image = PhotoImage(file="button_icon.png")  # Replace with a valid image path

# Create an image button
button = tk.Button(root, image=image, command=on_click, width=200)

button.pack(pady=20)

root.mainloop()
Screenshot in macOS

Screenshot in Windows
Conclusion
In this tutorial, we explored how to use the width option in Tkinter’s Button widget to control button width. The width is measured in characters for text buttons and in pixels for image buttons. By setting different width values, you can adjust the appearance of buttons in your Tkinter application.