Underline Text in Label in Tkinter Python
In Tkinter, the underline option of a Label widget allows you to underline a specific character in the text. The value assigned to underline represents the index of the character to be underlined, with indexing starting from 0.
To underline the entire text, we use a workaround by applying the font attribute with an underline font style.
In this tutorial, we will explore different examples to underline text in a Tkinter Label.
Examples
1. Underlining a Single Character in Label Text
In this example, we will underline the first character of the text in the Label.
import tkinter as tk
# Create the main window
root = tk.Tk()
root.title("tutorialkart.com - Underline Text Example")
root.geometry("400x200")
# Create a Label with an underlined character (first character)
label = tk.Label(root, text="TutorialKart", underline=0, font=("Arial", 14))
label.pack(pady=20)
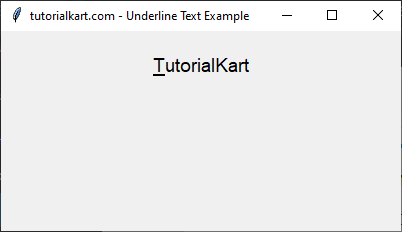
root.mainloop()Output in Windows:
The first character ‘T’ in “TutorialKart” is underlined.
2. Underlining the Last Character in Label Text
This example underlines the last character of the text.
import tkinter as tk
root = tk.Tk()
root.title("tutorialkart.com - Underline Text Example")
root.geometry("400x200")
text_value = "Tkinter Label"
label = tk.Label(root, text=text_value, underline=len(text_value)-1, font=("Arial", 14))
label.pack(pady=20)
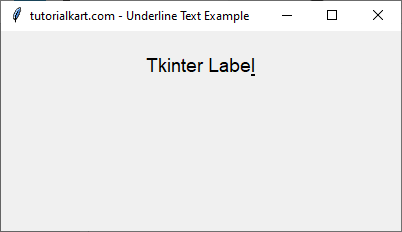
root.mainloop()Output in Windows:
The last character ‘l’ in “Tkinter Label” is underlined.
3. Underlining the Whole Text Using Font Styles in Label in Tkinter
This example underlines the entire text by modifying the font attribute.
import tkinter as tk
from tkinter import font
root = tk.Tk()
root.title("tutorialkart.com - Underline Text Example")
root.geometry("400x200")
# Define a font with underline
underline_font = font.Font(family="Arial", size=14, underline=True)
# Create a Label with the entire text underlined
label = tk.Label(root, text="Complete Underline", font=underline_font)
label.pack(pady=20)
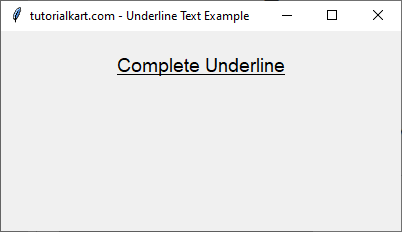
root.mainloop()Output in Windows:
The entire text “Complete Underline” is underlined.
4. Underlining Multiple Labels in Tkinter
In this example, we will create multiple labels with different underlining styles.
import tkinter as tk
from tkinter import font
root = tk.Tk()
root.title("tutorialkart.com - Underline Text Example")
root.geometry("400x200")
# Define an underlined font
underline_font = font.Font(family="Arial", size=14, underline=True)
# Label with first character underlined
label1 = tk.Label(root, text="TutorialKart", underline=0, font=("Arial", 14))
label1.pack(pady=5)
# Label with last character underlined
text_value = "Tkinter Label"
label2 = tk.Label(root, text=text_value, underline=len(text_value)-1, font=("Arial", 14))
label2.pack(pady=5)
# Label with full text underlined
label3 = tk.Label(root, text="Complete Underline", font=underline_font)
label3.pack(pady=5)
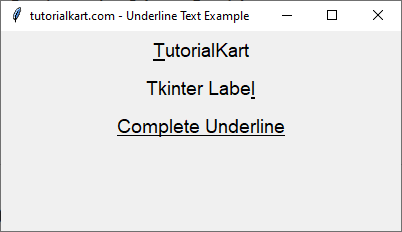
root.mainloop()Output in Windows:
Three labels are displayed with different underlining styles: first character, last character, and full text underlined.
Conclusion
In this tutorial, we explored how to underline text in a Tkinter Label using two methods:
- Using the
underlineoption to underline a specific character in the text. - Using the
fontattribute to underline the entire text.
By using these techniques, you can enhance the readability and visual appeal of your Tkinter applications.