Wrap Content in Text Widget in Tkinter Python
In Tkinter, the Text widget allows users to enter and display multiple lines of text. By default, the text continues on a single line unless it is manually wrapped using the wrap option.
The wrap option in Tkinter’s Text widget determines how text is wrapped inside the widget. There are three possible values:
wrap="none"– The text does not wrap and extends beyond the widget’s width.wrap="char"– The text wraps at the character level when the content reaches the widget’s width.wrap="word"– The text wraps at word boundaries to ensure complete words move to the next line.
In this tutorial, we will go through examples using the wrap option to wrap content inside a Tkinter Text Widget.
Examples
1. Wrapping Text at Word Boundaries in Text Widget
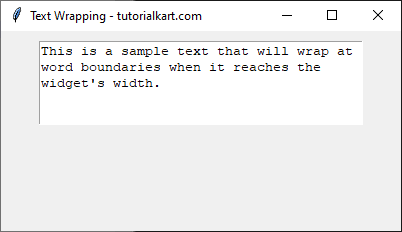
In this example, we create a Tkinter window with a Text widget where text wraps at word boundaries using wrap="word". This ensures that entire words move to the next line instead of breaking in between.
To achieve this, we define a Text widget with a width of 40 characters and a height of 5 lines. We use the wrap="word" option to ensure the text wraps properly at word boundaries. The insert() function is used to insert a long sample text into the widget.
main.py
import tkinter as tk

root = tk.Tk()
root.title("Text Wrapping - tutorialkart.com")
root.geometry("400x200")

# Create a Text widget with word wrapping
text_widget = tk.Text(root, width=40, height=5, wrap="word")
text_widget.pack(pady=10)

# Insert sample text
sample_text = "This is a sample text that will wrap at word boundaries when it reaches the widget's width."
text_widget.insert("1.0", sample_text)

root.mainloop()
Output in Windows:
The text is wrapped at word boundaries, ensuring words remain intact without breaking.
2. Wrapping Text at Character Level in Text Widget
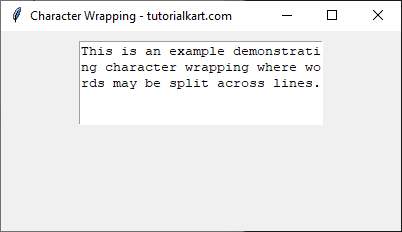
In this example, we use wrap="char" to wrap text at the character level. This means words can be split across lines if they exceed the widget’s width.
We define a Text widget with a width of 30 characters and a height of 5 lines. The wrap="char" option ensures that text wraps as soon as it reaches the widget’s boundary, even if it breaks a word in between. We use insert() to add a sample paragraph to demonstrate the effect.
main.py
import tkinter as tk

root = tk.Tk()
root.title("Character Wrapping - tutorialkart.com")
root.geometry("400x200")

# Create a Text widget with character wrapping
text_widget = tk.Text(root, width=30, height=5, wrap="char")
text_widget.pack(pady=10)

# Insert sample text
sample_text = "This is an example demonstrating character wrapping where words may be split across lines."
text_widget.insert("1.0", sample_text)

root.mainloop()
Output in Windows:
The text is wrapped at character level, causing words to break across lines when they reach the edge of the widget.
Conclusion
In this tutorial, we explored how to use the wrap option in Tkinter’s Text widget to control text wrapping. The key options are:
wrap="none"– No wrapping; text extends beyond the widget’s width.wrap="char"– Wraps text at the character level, potentially breaking words.wrap="word"– Wraps text at word boundaries for better readability.