SAP Fiori Step-by-Step Tutorial for Beginners
SAP Fiori Tutorial for Beginners
SAP Fiori is a cutting-edge user experience (UX) platform designed to simplify and enhance interaction with SAP applications.
This step-by-step tutorial for beginners will guide you through the fundamentals of SAP Fiori, from understanding its architecture to creating and customizing applications.
Whether you’re exploring SAP Fiori for the first time or looking to develop role-based, intuitive applications, this guide provides a comprehensive overview of its frontend and backend integration, including the use of SAP HANA, OData services, and SAPUI5.
By the end of this tutorial, you’ll be equipped to set up SAP Fiori Launchpad, create personalized applications, and deliver a seamless user experience across devices.
Introduction to SAP Fiori
SAP Fiori is a user experience (UX) platform designed to provide a consistent, role-based, and personalized experience across all devices. It is integrated with SAP S/4HANA and supports mobile and desktop interaction patterns. Below is a structured tutorial to help beginners get started with SAP Fiori.

Step 1: Understand SAP Fiori Architecture
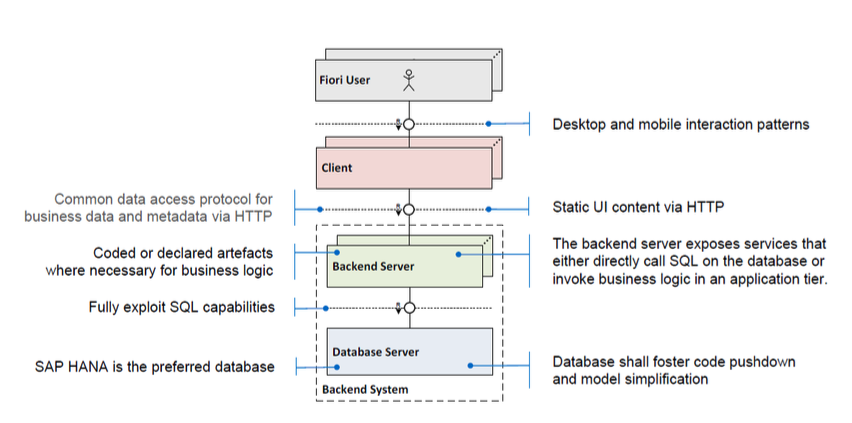
SAP Fiori follows a multi-layer architecture as illustrated in the diagram:
- Frontend (Fiori User and Client):
- Users access applications via browsers or mobile devices.
- The client layer provides a static UI over HTTP.
- Backend System (Backend Server and Database Server):
- Backend Server:
- Contains business logic.
- Processes HTTP requests and executes SQL commands.
- Database Server:
- Stores data and supports code pushdown to optimize performance.
- SAP HANA is the preferred database.
Step 2: Install Required Components
To work with SAP Fiori, you need the following:
- SAP NetWeaver Gateway: Enables integration between frontend and backend.
- SAP HANA Database: Stores transactional and analytical data.
- SAP Fiori Launchpad: Centralized access point for Fiori apps.
Step 3: Setting Up SAP Fiori Launchpad
- Activate OData Services:
- Open SAP GUI.
- Navigate to
Transaction Code: /IWFND/MAINT_SERVICE. - Add the OData services required for Fiori applications.
- Configure Launchpad Designer:
- Use
Transaction Code: /UI2/FLPD_CUST. - Create catalogs and groups.
- Assign tiles (applications) to specific groups.
Step 4: Create and Configure Fiori Applications
- Develop the UI Layer:
- Use SAPUI5 (the frontend technology for Fiori) and Web IDE to create user interfaces.
- Basic structure:
- View: Defines the UI layout in XML.
- Controller: Implements the business logic in JavaScript.
- Connect to Backend:
- Use OData services to fetch data from the backend.
- Test endpoints in the SAP Gateway Client (
Transaction Code: /IWFND/GW_CLIENT).
Step 5: Customize Fiori Applications
- Extend Standard Apps:
- Use SAP Web IDE to customize standard Fiori apps by adding fields or modifying workflows.
- Deploy Custom Apps:
- After testing, deploy your app to the Fiori Launchpad via the transport system.
Step 6: Assign Roles and Permissions
- Create Roles:
- Use
Transaction Code: PFCG. - Assign catalogs, groups, and Fiori apps to roles.
- Assign Users:
- Map users to the created roles.
Step 7: Testing and Troubleshooting
- Test the application in the Fiori Launchpad.
- Use browser developer tools for debugging UI issues.
- Monitor backend logs via
Transaction Code: /IWFND/ERROR_LOG.
Step 8: Best Practices
- Optimize Backend Performance:
- Push logic to the database layer using SQL.
- Use views and stored procedures in SAP HANA.
- Ensure Security:
- Enable HTTPS for secure communication.
- Configure Single Sign-On (SSO).
- Keep It Simple:
- Focus on delivering a role-based, task-centric design.
SAP FIORI tutorials
SAP Fiori Tutorial Topics
- SAP Fiori – Introduction
Overview of SAP Fiori and its purpose in modernizing SAP applications. - SAP Fiori – Architecture
Explanation of the three-layer architecture: frontend, backend, and database. - SAP Fiori – NetWeaver Gateway
Role of the Gateway in bridging frontend apps and backend systems. - SAP Fiori – Installation
Step-by-step guide to installing SAP Fiori components. - SAP Fiori – Launchpad
Setting up and customizing the Fiori Launchpad. - SAP Fiori – OData Services
Understanding and using OData services for data communication. - SAP Fiori – Transactional Apps
Introduction to apps that handle day-to-day business tasks. - SAP Fiori – Fact Sheets
Apps for detailed business object information. - SAP Fiori – Analytical Apps
Apps for visualizing data and tracking KPIs. - SAP Fiori – Theme Designer
Customizing the look and feel of Fiori apps. - SAP Fiori – Security
Ensuring secure access with roles and permissions. - SAP Fiori – Data Flow
Understanding how data moves between Fiori layers. - SAP Fiori – Workflow
Automating business processes with Fiori workflows. - SAP Fiori – Extension
Customizing and extending standard Fiori apps. - SAP Fiori – UI5 Concepts
Learning the basics of SAPUI5, the framework behind Fiori. - SAP Fiori – Design Patterns
Best practices for building efficient and intuitive apps.
Conclusion
SAP Fiori simplifies user interactions with enterprise software through a modern interface. By following the above steps, you can develop and customize applications while ensuring a seamless experience for users.
