SwiftUI Image Resize
In SwiftUI, the Image View allows you to display images in your app. By default, the image adopts its natural size, but you can customize its dimensions using modifiers. Resizing images is crucial for maintaining consistency in your app’s design, optimizing layout, and enhancing visual appeal.


In this tutorial, we will guide you through resizing images in SwiftUI with two examples.
When to Resize an Image
Resizing images is beneficial in scenarios like:
- Creating responsive layouts that adapt to different screen sizes.
- Optimizing image display for better performance.
- Aligning images with your app’s design requirements.
Syntax to Resize an Image
Here’s a basic syntax for resizing an image using the .resizable() modifier:
Image("imageName")
    .resizable()
    .frame(width: customWidth, height: customHeight)
Examples to Resize an Image
In the following examples, we take sampleImage with dimensions 500×334, and go through scenarios where we resize this image.
sampleImage.jpg

Example 1: Resizing an Image with Fixed Dimensions
In this example, we resize an image to a fixed width and height using the .resizable() and .frame() modifiers. This is useful for maintaining a consistent layout where images need to match a specific size.
File: ContentView.swift
import SwiftUI

struct ContentView: View {
  var body: some View {
    VStack {
      Image("sampleImage")
        .resizable()
        .frame(width: 150, height: 150)

      Text("Fixed Size Image")
        .font(.headline)
    }
    .padding()
  }
}

#Preview {
  ContentView()
}
Detailed Explanation
- Image: The
Imageview loads an image namedexampleImagefrom the app’s assets. - .resizable(): Allows the image to be resized from its original dimensions.
- .frame: Specifies a fixed width and height for the image, making it consistent in size.
Output

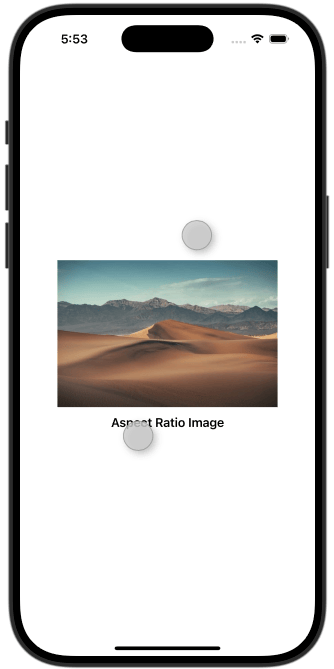
Example 2: Resizing an Image with Aspect Ratio
In this example, we resize an image while preserving its aspect ratio using the .aspectRatio() modifier. This approach ensures the image scales proportionally without distortion.
File: ContentView.swift
import SwiftUI

struct ContentView: View {
  var body: some View {
    VStack {
      Image("sampleImage")
        .resizable()
        .aspectRatio(contentMode: .fit)
        .frame(width: 300)

      Text("Aspect Ratio Image")
        .font(.headline)
    }
    .padding()
  }
}

#Preview {
  ContentView()
}
Detailed Explanation
- Image: Displays an image named
exampleImagefrom the app’s assets. - .resizable(): Enables resizing of the image.
- .aspectRatio: Maintains the image’s original aspect ratio, ensuring it scales proportionally.
- .frame: Sets a maximum width for the image while allowing height to adjust automatically.
Output

Conclusion
Resizing images in SwiftUI is straightforward and provides flexibility to match your app’s design needs. Whether you’re using fixed dimensions or preserving aspect ratios, the .resizable(), .frame(), and .aspectRatio() modifiers help you achieve the desired look and functionality.
