SwiftUI – Text Font
In SwiftUI, you can customize the font of a Text view using the .font() modifier. This allows you to control the size, style, and weight of the text, making it more visually appealing and improving readability. SwiftUI provides a variety of predefined font styles as well as the ability to use custom fonts.
In this SwiftUI tutorial, we will explore how to use predefined fonts, dynamic text sizes, and custom fonts to style your text in SwiftUI.
Syntax for Setting Text Font
The basic syntax for setting the font of a Text view is:
Text("Your text here")
    .font(Font.style)
Here:
"Your text here": The content of theTextview.Font.style: A predefined or custom font style, such as.largeTitle,.headline, or a custom font.
SwiftUI’s predefined font styles dynamically adapt to the user’s preferred text size, ensuring accessibility and consistency across devices.
Examples
Let’s look at some examples of how to use text fonts in SwiftUI.
Example 1: Using Predefined Fonts
SwiftUI offers several predefined font styles for common use cases, such as titles, body text, and captions.
Code Example:
import SwiftUI

struct ContentView: View {
    var body: some View {
        VStack(spacing: 20) {
            Text("Large Title").font(.largeTitle)
            Text("Title").font(.title)
            Text("Headline").font(.headline)
            Text("Body Text").font(.body)
            Text("Caption").font(.caption)
        }
        .padding()
    }
}
Explanation:
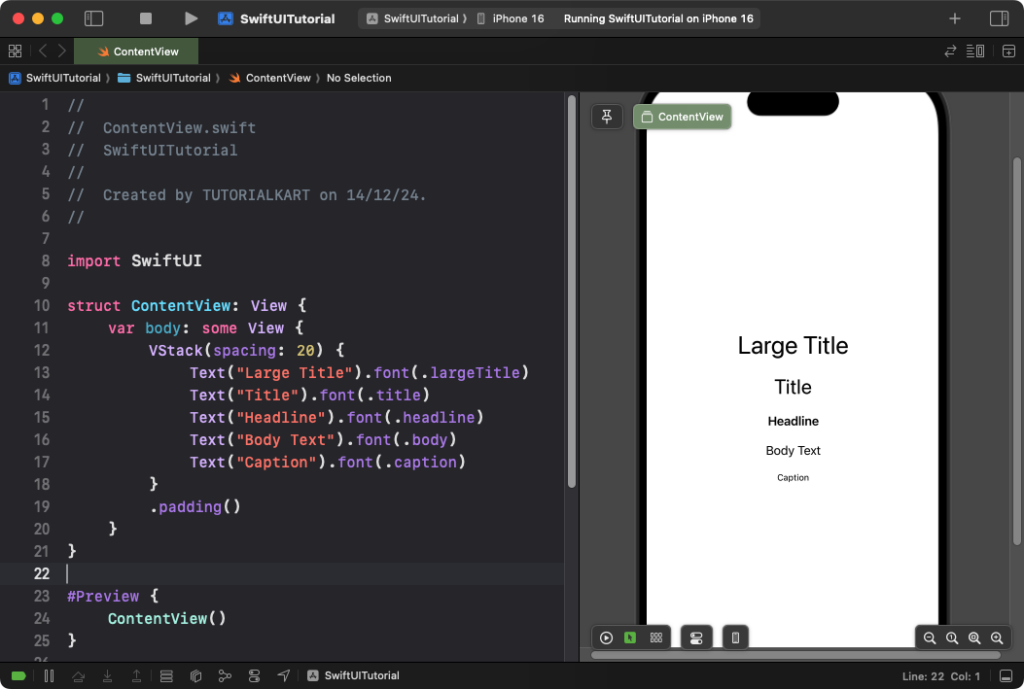
.largeTitle: Used for prominent titles, such as headings on screens..title: Used for section headings or smaller titles..headline: Emphasized text for highlighting key information..body: Standard font for body text, suitable for paragraphs..caption: Smaller font for additional details, such as captions under images.
Result: The text will display in different predefined font styles, showing their visual hierarchy and intended use.
Example 2: Using Custom Fonts
You can use custom fonts by specifying their name and size. Make sure the font is added to your project and listed in the Info.plist file.
Code Example:
import SwiftUI

struct ContentView: View {
    var body: some View {
        Text("Custom Font Example")
            .font(.custom("Courier New", size: 32))
            .padding()
    }
}
Explanation:
- The
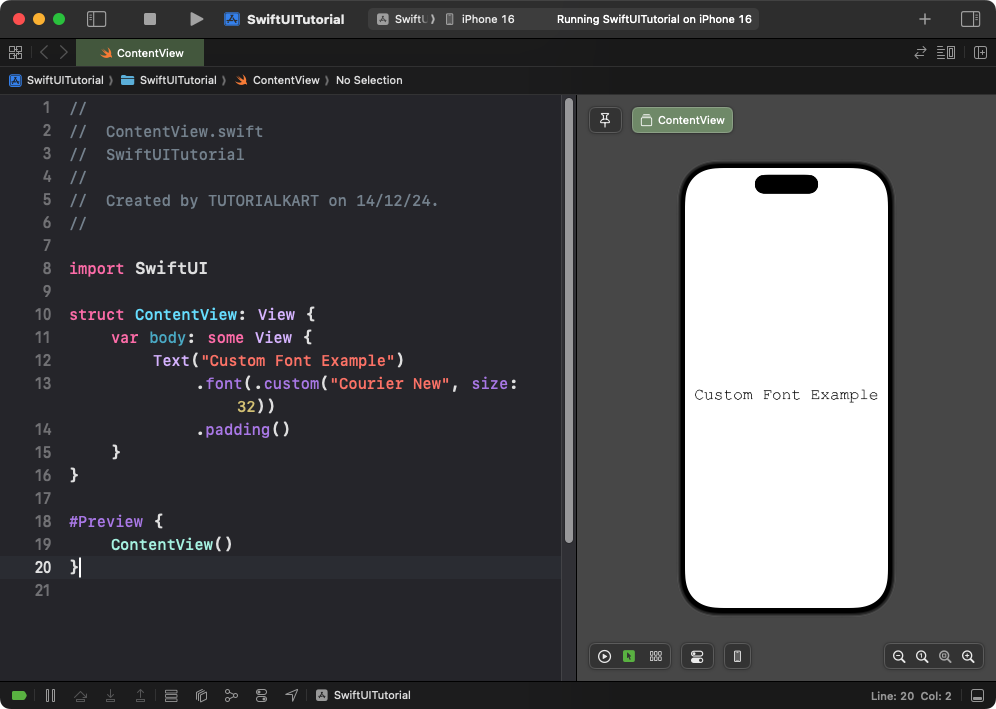
.custom("Courier New", size: 32)specifies the font name and size. - Ensure the custom font is available in the system or added to your project assets.
Result: The text will appear in the “Courier New” font with a size of 24 points.
Example 3: Dynamic Type for Accessibility
SwiftUI’s font styles adapt to the user’s preferred text size, ensuring accessibility. You can explicitly specify dynamic fonts for better support:
Code Example:
import SwiftUI

struct ContentView: View {
    var body: some View {
        Text("Dynamic Text Example")
            .font(.body) // Adapts to user preferences
            .padding()
    }
}
Explanation:
- The
.bodyfont style dynamically adjusts based on the user’s system settings. - This ensures better readability for users who prefer larger or smaller text sizes.
Result: The text automatically adjusts its size according to the device’s text size settings.
Conclusion
The .font() modifier in SwiftUI offers powerful options for customizing text styles, from predefined system fonts to custom and dynamic type settings. By choosing the right font styles, you can create accessible, visually appealing, and consistent user interfaces in your apps.
