SwiftUI – Text Padding
In SwiftUI, the padding() modifier is used to add spacing around a Text view (or any other view). Padding enhances readability and helps to create visually pleasing layouts by spacing out elements.
Padding can be applied equally on all sides of the text or specifically on selected edges.
In this SwiftUI Tutorial, you will how to apply padding to a Text view, with syntax and examples.
Syntax for Text Padding
The basic syntax for applying padding to a Text view is:
Text("Your text here")
    .padding() // Adds default padding on all sides
To customise padding, you can specify edges and/or values:
Text("Your text here")
    .padding(.all, 20) // Adds 20 points of padding on all sides
Here:
.padding(): Adds system-defined padding on all sides..padding(.all, value): Adds a specific amount of padding on all sides..padding(.horizontal, value): Adds padding on the left and right edges..padding(.vertical, value): Adds padding on the top and bottom edges..padding(.top, value),.padding(.bottom, value), etc.: Adds padding to specific edges.
Examples
Let’s explore some examples to understand how to use padding with text in SwiftUI.
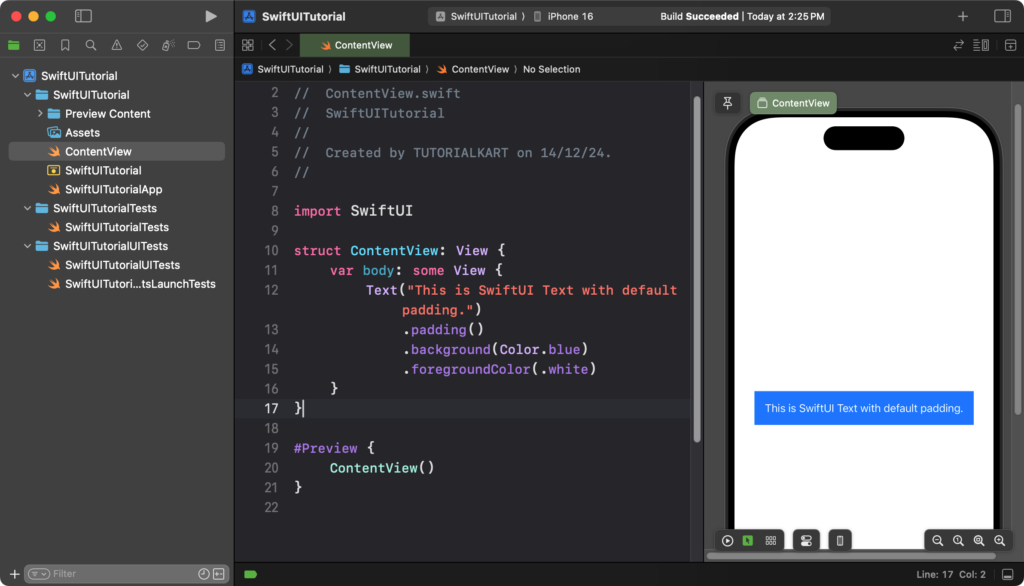
Example 1: Default Padding
Here’s how to apply default padding to a text view:
Code Example:
import SwiftUI

struct ContentView: View {
    var body: some View {
        Text("This is SwiftUI Text with default padding.")
            .padding()
            .background(Color.blue)
            .foregroundColor(.white)
    }
}
Explanation:
.padding()adds the default system-defined padding on all sides of the text.- The
.background(Color.blue)highlights the padding area with a blue background. - The text color is set to white for better contrast using
.foregroundColor(.white).
Result: The text is surrounded by padding, creating a clean and spacious layout.
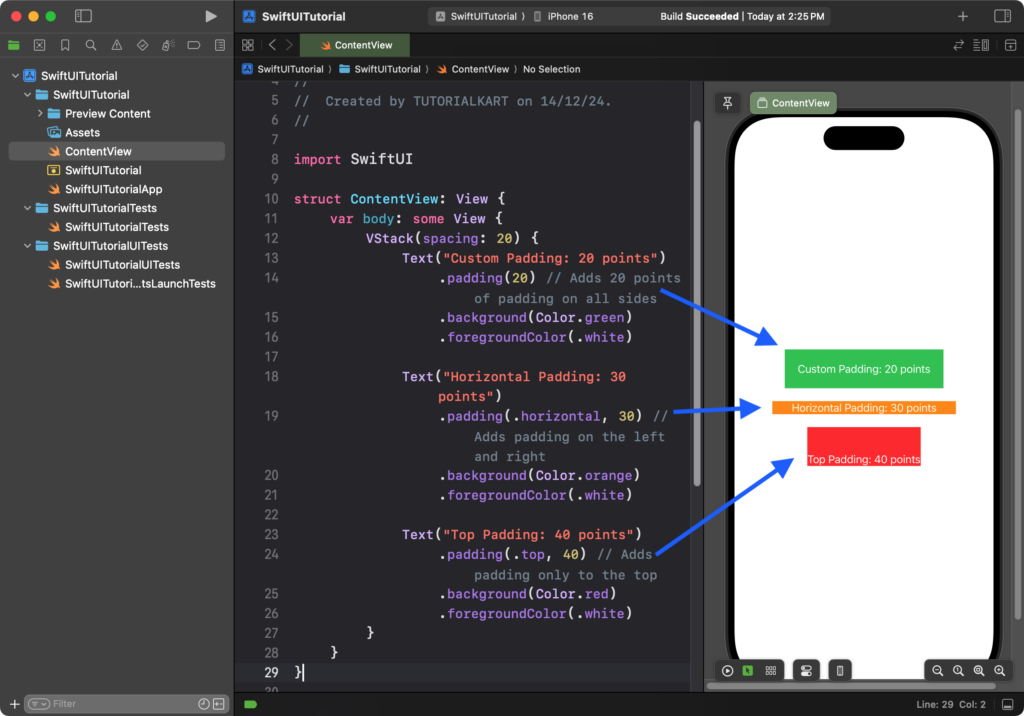
Example 2: Custom Padding
Here’s how to apply custom padding values:
Code Example:
import SwiftUI

struct ContentView: View {
    var body: some View {
        VStack(spacing: 20) {
            Text("Custom Padding: 20 points")
                .padding(20) // Adds 20 points of padding on all sides
                .background(Color.green)
                .foregroundColor(.white)

            Text("Horizontal Padding: 30 points")
                .padding(.horizontal, 30) // Adds padding on the left and right
                .background(Color.orange)
                .foregroundColor(.white)

            Text("Top Padding: 40 points")
                .padding(.top, 40) // Adds padding only to the top
                .background(Color.red)
                .foregroundColor(.white)
        }
    }
}
Explanation:
- The first text uses
.padding(20), adding equal padding on all sides. - The second text uses
.padding(.horizontal, 30), adding padding to the left and right only. - The third text uses
.padding(.top, 40), adding padding only to the top edge.
Result: Each text view demonstrates different types of padding, clearly showing how customized spacing affects layout.
Conclusion
SwiftUI’s padding() modifier is a simple yet powerful tool for improving readability and creating clean layouts. By combining default and custom padding options, you can design text views that fit seamlessly into your app’s interface.
