Flutter – Change Container Margins Differently at Left, Right, Top, Bottom
You can change margin for a Container widget differently using EdgeInsets class.
To change Container margins differently for left, right, top and bottom, use the following syntax.
</>
Copy
Container(
    margin: EdgeInsets.only(left: 20, top:10, right: 20, bottom:0),
    child: Widget,
)
You can provide only the fields you require to EdgeInsets.only(). The default value is 0 for all of the margins (left, top, right and bottom).
Example Flutter Application
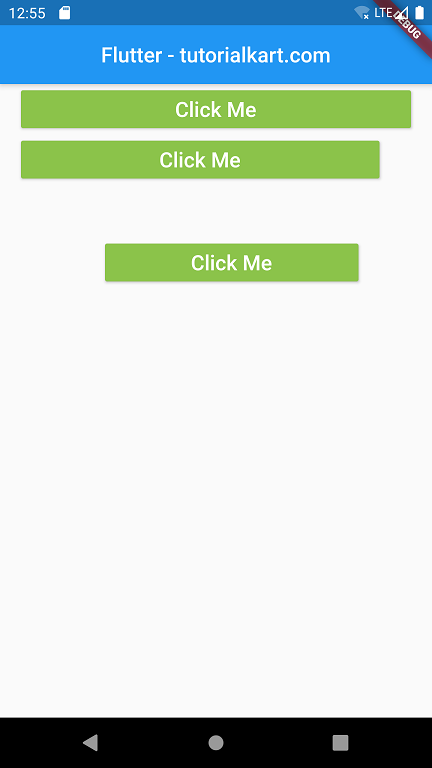
In the following Flutter Application main.dart, we have created three Container widgets and provided different margins for left, right, top and bottom.
main.dart
</>
Copy
import 'package:flutter/material.dart';

void main() {
  runApp(MyApp());
}

class MyApp extends StatefulWidget {
  @override
  _MyAppState createState() => _MyAppState();
}

class _MyAppState extends State<MyApp> {
  @override
  Widget build(BuildContext context) {
    return MaterialApp(
        home: Scaffold(
      appBar: AppBar(
        title: Center(child: Text('Flutter - tutorialkart.com')),
      ),
      body: Container(
          child: ListView(children: <Widget>[
        Container(
            margin: EdgeInsets.only(left: 20, right: 20),
            child: RaisedButton(
                onPressed: () => {},
                textColor: Colors.white,
                color: Colors.lightGreen,
                child: Text(
                  'Click Me',
                  style: TextStyle(fontSize: 20),
                ))),
        Container(
            margin: EdgeInsets.only(left: 20, right: 50),
            child: RaisedButton(
                onPressed: () => {},
                textColor: Colors.white,
                color: Colors.lightGreen,
                child: Text(
                  'Click Me',
                  style: TextStyle(fontSize: 20),
                ))),
        Container(
            margin: EdgeInsets.only(left: 100, right: 70, top: 50),
            child: RaisedButton(
                onPressed: () => {},
                textColor: Colors.white,
                color: Colors.lightGreen,
                child: Text(
                  'Click Me',
                  style: TextStyle(fontSize: 20),
                ))),
      ])),
    ));
  }
}
When you run this application, you will see the Container widgets in UI as shown below, with different margins on four sides.

Conclusion
In this Flutter Tutorial, we learned how to provide different values for left, top, right and bottom margins.
