Android Game Development
There are many ways and many frameworks out there for Android Game development. But, this Kotlin Android Tutorial helps you to get started with Android Game Development from scratch with well detailed steps.
Game Story
Any game that you would like to develop should have a story and script. You have to decide about the players in the game, the strategies, how you level up in the game, and what are the objects that are going to be used. When you are ready with an fully scripted idea, you are good to start for taking it to application development mode. Small changes to the script during the development may not cost you much time, but if there are major changes to the game plan or such, it may eat up your development time. And this could be checked to some extent by modularizing your code.
In this tutorial, our game story is as follows.
There is a grenade trying to blast you. The player has to avoid it. A simple hero-villain story to get started.
What game development techniques we shall learn in this tutorial
For any android application development, we need some techniques. For example, if you are creating a Contacts application, you should be having an idea of how to get the list of contacts and how to present it to the user : these are the techniques or capabilities that the developer should be aware of.
Similarly for this android game, we shall learn following techniques to realize our game.
- PlayGround : Use of SurfaceView and SurfaceHolder.Callback
- Sprites on Playground : In Gaming terminology, Sprite is a 2D bitmap image drawn on to the Canvas of SurfaceView
- Sprite Movement : Redrawing the image of sprite at a different position
- Sprite Position : Tracking the touch of the Android user, to update the position of sprite(s)
Example – Android Game Development
Following is a step-by-step guide to develop an Android Game in Kotlin programming language. Or if you like to get to the code and go through it yourself, you may find the zipped file at https://github.com/tutorialkart/Android-Game-Examples/blob/master/ExampleGame.zip.
Step 1: Create an Android Application for the Game
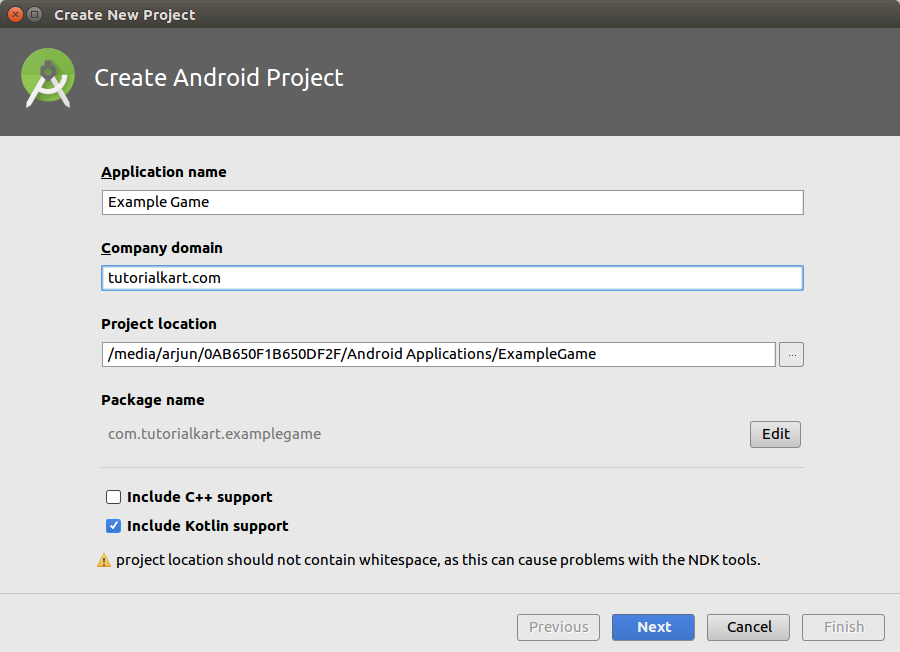
Open Android Studio and create a new Application with Kotlin support.Lets name our application with “Example Game” and Click on Next.
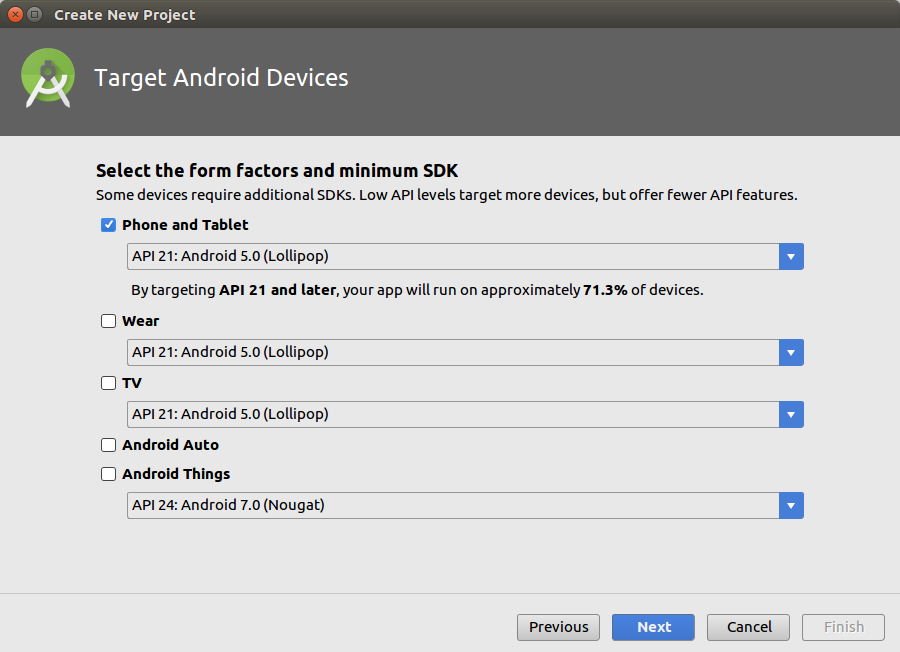
Select API version. For this project, we have selected Android 5.0 as minimum supported Android version. Click on Next.
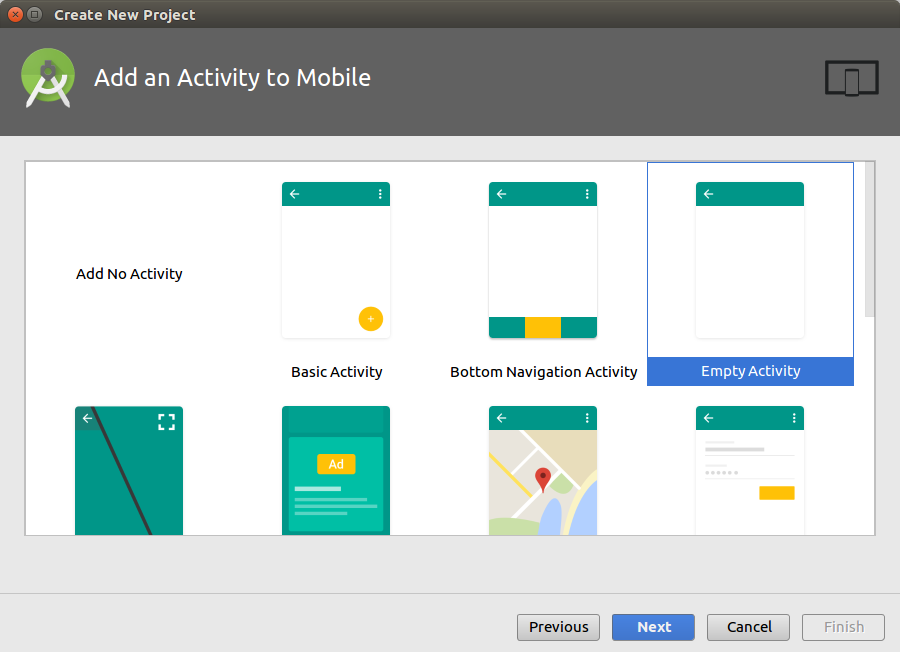
Select “Empty Activity” and Click on Next.
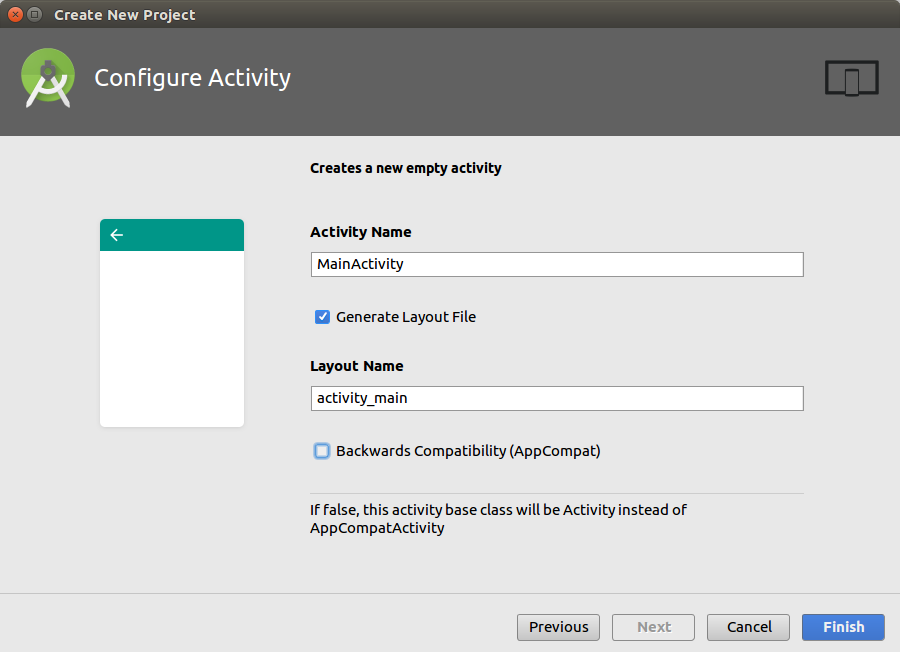
Name your Main Activity file and layout file. Uncheck “Backwards Compatibility(AppCompat)” and click on Finish. Our Android Application is created.
Step 2: Add SurfaceView and SurfaceHolder.Callback
SurfaceView by default does not help us much. So, we shall create a class that extends SurfaceView and implements SurfaceHolder.Callback.
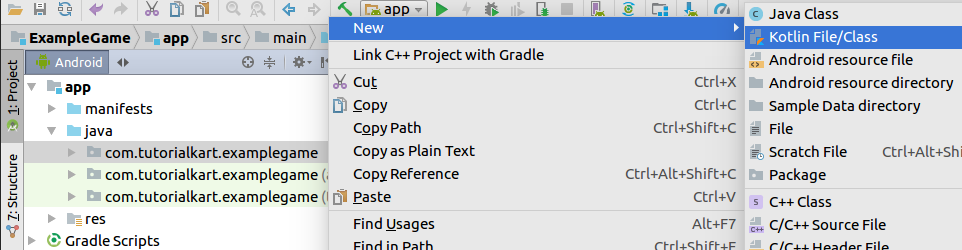
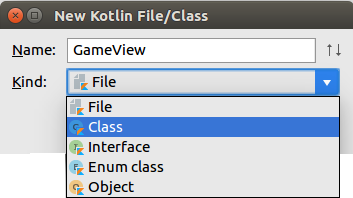
Right Click on the package “com.tutorialkart.examplegame” and follow the actions.
Give name as “GameView” and select “Class” for Kind.
GameView.kt
class GameView {
}
Change the primary constructor or GameView to GameView(context: Context, attributes: AttributeSet) and extend with SurfaceView(context, attributes), SurfaceHolder.Callback.
You should override some of the functions of SurfaveHolder.Callback as shown in the below program.
Also, in order to update the position of our players and draw them on the Canvas of SurfaceView, we need to create a function update() and override draw(Canvas: canvas) function of SurfaceView.
GameView.kt
import android.content.Context
import android.graphics.Canvas
import android.util.AttributeSet
import android.view.SurfaceHolder
import android.view.SurfaceView

class GameView(context: Context, attributes: AttributeSet) : SurfaceView(context, attributes), SurfaceHolder.Callback {
    override fun surfaceDestroyed(p0: SurfaceHolder?) {
        TODO("not implemented") //To change body of created functions use File | Settings | File Templates.
    }

    override fun surfaceCreated(p0: SurfaceHolder?) {
        TODO("not implemented") //To change body of created functions use File | Settings | File Templates.
    }

    override fun surfaceChanged(p0: SurfaceHolder?, p1: Int, p2: Int, p3: Int) {
        TODO("not implemented") //To change body of created functions use File | Settings | File Templates.
    }

    /**
     * Function to update the positions of player and game objects
     */
    fun update() {

    }

    /**
     * Everything that has to be drawn on Canvas
     */
    override fun draw(canvas: Canvas) {
        super.draw(canvas)
    }

}
Step 3: Include GameView in activity_main.xml
We shall use the GameView in activity_main.xml.
activity_main.xml
<?xml version="1.0" encoding="utf-8"?>
<RelativeLayout xmlns:android="http://schemas.android.com/apk/res/android"
    xmlns:tools="http://schemas.android.com/tools"
    android:layout_width="match_parent"
    android:layout_height="match_parent"
    tools:context="com.tutorialkart.examplegame.MainActivity">

    <com.tutorialkart.examplegame.GameView
        android:layout_width="match_parent"
        android:layout_height="match_parent" />

</RelativeLayout>
And in the AndroidManifest.xml, lets set the theme as Theme.NoTitleBar.Fullscreen, for the MainActivity.
AndroidManifest.xml
<?xml version="1.0" encoding="utf-8"?>
<manifest xmlns:android="http://schemas.android.com/apk/res/android"
    package="com.tutorialkart.examplegame">

    <application
        android:allowBackup="true"
        android:icon="@mipmap/ic_launcher"
        android:label="@string/app_name"
        android:roundIcon="@mipmap/ic_launcher_round"
        android:supportsRtl="true"
        android:theme="@style/AppTheme">
        <activity android:name=".MainActivity"
            android:theme="@android:style/Theme.NoTitleBar.Fullscreen">
            <intent-filter>
                <action android:name="android.intent.action.MAIN" />
                <category android:name="android.intent.category.LAUNCHER" />
            </intent-filter>
        </activity>
    </application>

</manifest>
Step 4: FullScreen Activity.
Make your Activity get rid of the notification bar and title bar.
MainActivity.kt
package com.tutorialkart.examplegame

import android.app.Activity
import android.os.Bundle
import android.view.WindowManager
import android.util.DisplayMetrics

class MainActivity : Activity() {

    override fun onCreate(savedInstanceState: Bundle?) {
        super.onCreate(savedInstanceState)

        // remove notification bar
        this.getWindow().setFlags(WindowManager.LayoutParams.FLAG_FULLSCREEN, WindowManager.LayoutParams.FLAG_FULLSCREEN)

        setContentView(R.layout.activity_main)
    }
}
Step 5: Create Game Thread
Next thing we need to do is, creating a thread which calls GameView for : updating the state of the game and drawing the game objects on to Canvas. GameView runs on UI Thread and it could go through different stages of life cycle. We do not want this to mess up with the smoothness of our game, which is why we are using a dedicated thread.
We shall create a Kotlin Class named, “GameThread”. The process of creating this Kotlin Class is same as that of GameView Class.
GameThread.kt
package com.tutorialkart.examplegame

import android.graphics.Canvas
import android.view.SurfaceHolder

/**
 * Created by arjun on 26/12/17.
 */

class GameThread(private val surfaceHolder: SurfaceHolder, private val gameView: GameView) : Thread() {
    private var running: Boolean = false

    private val targetFPS = 50 // frames per second, the rate at which you would like to refresh the Canvas

    fun setRunning(isRunning: Boolean) {
        this.running = isRunning
    }

    override fun run() {
        var startTime: Long
        var timeMillis: Long
        var waitTime: Long
        val targetTime = (1000 / targetFPS).toLong()

        while (running) {
            startTime = System.nanoTime()
            canvas = null

            try {
                // locking the canvas allows us to draw on to it
                canvas = this.surfaceHolder.lockCanvas()
                synchronized(surfaceHolder) {
                    this.gameView.update()
                    this.gameView.draw(canvas!!)
                }
            } catch (e: Exception) {
                e.printStackTrace()
            } finally {
                if (canvas != null) {
                    try {
                        surfaceHolder.unlockCanvasAndPost(canvas)
                    } catch (e: Exception) {
                        e.printStackTrace()
                    }
                }
            }

            timeMillis = (System.nanoTime() - startTime) / 1000000
            waitTime = targetTime - timeMillis

            try {
                sleep(waitTime)
            } catch (e: Exception) {
                e.printStackTrace()
            }
        }
    }

    companion object {
        private var canvas: Canvas? = null
    }

}
The important things to note here is the following four lines of code, in the try block.
canvas = this.surfaceHolder.lockCanvas()
synchronized(surfaceHolder) {
    this.gameView.update()
    this.gameView.draw(canvas!!)
} - We locked the Canvas, so that it allows us to draw on it.
- Using synchronized(surfaceHolder) means, we are not letting any other threads do any modifications to surfaceHolder (where Canvas is).
- Then we update the game state and draw the canvas with the new state of sprites.
- Once we are done updating the canvas, unlock it in the finally block.
surfaceHolder.unlockCanvasAndPost(canvas)
The rest of the code is trying to update the canvas at the frequency set by targetFPS.
And finally where we are going to start this GameThread ? Ofcourse from GameView.
GameView.kt
package com.tutorialkart.examplegame

import android.content.Context
import android.graphics.Canvas
import android.util.AttributeSet
import android.view.SurfaceView
import android.view.SurfaceHolder

/**
 * GameView is our playground.
 */

class GameView(context: Context, attributes: AttributeSet) : SurfaceView(context, attributes), SurfaceHolder.Callback {
    private val thread: GameThread

    init {

        // add callback
        holder.addCallback(this)

        // instantiate the game thread
        thread = GameThread(holder, this)
    }


    override fun surfaceCreated(surfaceHolder: SurfaceHolder) {
        // start the game thread
        thread.setRunning(true)
        thread.start()
    }

    override fun surfaceChanged(surfaceHolder: SurfaceHolder, i: Int, i1: Int, i2: Int) {

    }

    override fun surfaceDestroyed(surfaceHolder: SurfaceHolder) {
        var retry = true
        while (retry) {
            try {
                thread.setRunning(false)
                thread.join()
            } catch (e: Exception) {
                e.printStackTrace()
            }

            retry = false
        }
    }

    /**
     * Function to update the positions of player and game objects
     */
    fun update() {

    }

    /**
     * Everything that has to be drawn on Canvas
     */
    override fun draw(canvas: Canvas) {
        super.draw(canvas)
    }

}
Try giving it a run on an Android Phone. If all you are seeing is a black screen! Good. We have successfully learned to use create a SurfaceView. And we have prepared our playground. Now its time to introduce some players on to the field.
Step 6: Introducing Sprites.
Now, we shall introduce a sprite that moves on the Canvas. And keeping the idea that our game should be maintainable, when it becomes huge with code, we shall try to abstract a game object with a Class. We shall use the class to hold bitmap image, its position and state through the game. We shall take a Grenade as a Sprite.
Grenade.kt
package com.tutorialkart.examplegame

import android.content.res.Resources
import android.graphics.Bitmap
import android.graphics.Canvas

/**
 * Grenade Class.
 * It could be considered as System. System is playing against you in the game.
 * Grenade is the opponent.
 */

class Grenade(var image: Bitmap) {
    var x: Int = 0
    var y: Int = 0
    var w: Int = 0
    var h: Int = 0
    private var xVelocity = 20
    private var yVelocity = 20
    private val screenWidth = Resources.getSystem().displayMetrics.widthPixels
    private val screenHeight = Resources.getSystem().displayMetrics.heightPixels

    init {
        w = image.width
        h = image.height

        x = screenWidth/2
        y = screenHeight/2
    }

    /**
     * Draws the object on to the canvas.
     */
    fun draw(canvas: Canvas) {
        canvas.drawBitmap(image, x.toFloat(), y.toFloat(), null)
    }

    /**
     * update properties for the game object
     */
    fun update() {
        // val randomNum = ThreadLocalRandom.current().nextInt(1, 5)

        if (x > screenWidth - image.width || x < image.width) {
            xVelocity = xVelocity * -1
        }
        if (y > screenHeight - image.height || y < image.height) {
            yVelocity = yVelocity * -1
        }

        x += (xVelocity)
        y += (yVelocity)
    }

}
Take away from this class is that, we have two functions namely update() and draw(). We shall instantiate Grenade when Surface is created, and call Grenade.update() from GameView.update() and Grenade.draw() from GameView.draw().
This is kind of our scaling dimension. We can add as many types of sprites as per the game plan (script), and instantiate the sprites in GameView.surfaceCreated(), update the sprites’ state in GameView.update() and draw the sprite on to Canvas in GameView.draw().
GameView.kt
package com.tutorialkart.examplegame

import android.content.Context
import android.graphics.BitmapFactory
import android.graphics.Canvas
import android.util.AttributeSet
import android.view.SurfaceView
import android.view.SurfaceHolder

/**
 * GameView is our playground.
 */

class GameView(context: Context, attributes: AttributeSet) : SurfaceView(context, attributes), SurfaceHolder.Callback {
    private val thread: GameThread
    private var grenade: Grenade? = null

    init {

        // add callback
        holder.addCallback(this)

        // instantiate the game thread
        thread = GameThread(holder, this)
    }


    override fun surfaceCreated(surfaceHolder: SurfaceHolder) {
        // game objects
        grenade = Grenade(BitmapFactory.decodeResource(resources, R.drawable.grenade))

        // start the game thread
        thread.setRunning(true)
        thread.start()
    }

    override fun surfaceChanged(surfaceHolder: SurfaceHolder, i: Int, i1: Int, i2: Int) {

    }

    override fun surfaceDestroyed(surfaceHolder: SurfaceHolder) {
        var retry = true
        while (retry) {
            try {
                thread.setRunning(false)
                thread.join()
            } catch (e: Exception) {
                e.printStackTrace()
            }

            retry = false
        }
    }

    /**
     * Function to update the positions of sprites
     */
    fun update() {
        grenade!!.update()
    }

    /**
     * Everything that has to be drawn on Canvas
     */
    override fun draw(canvas: Canvas) {
        super.draw(canvas)

        grenade!!.draw(canvas)
    }
}
Add the following image file to res/drawable

Output
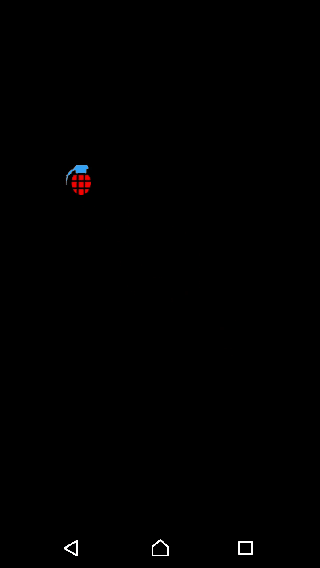
When run the application in an Android device, the result would look like below.
Step 7: Introducing another Sprite – Our next and ofcourse the most important Game Object.
For the player, we shall use a circle kind of image and make it track the touch on the screen. And like Grenade.kt, we are going to have update() and draw() functions.
Player.kt
package com.tutorialkart.examplegame

import android.content.res.Resources
import android.graphics.Bitmap
import android.graphics.Canvas

/**
 * Player Class.
 */

class Player(private val image: Bitmap) {
    private var x: Int = 0
    private var y: Int = 0
    private val w: Int
    private val h: Int
    private val screenWidth = Resources.getSystem().displayMetrics.widthPixels
    private val screenHeight = Resources.getSystem().displayMetrics.heightPixels

    init {
        w = image.width
        h = image.height

        x = screenWidth/2
        y = screenHeight - 200
    }

    /**
     * Draws the object on to the canvas.
     */
    fun draw(canvas: Canvas) {
        canvas.drawBitmap(image, x.toFloat(), y.toFloat(), null)
    }

    /**
     * update properties for the game object
     * when the player touches the screen, position the player bitmap there
     */
    fun updateTouch(touch_x: Int, touch_y: Int) {
        x = touch_x - w / 2
        y = touch_y - h / 2
    }

}
Now we have to make use of Player in our GameView, just as we did for Grenade.kt. But we are going to learn one more thing in this step. That is, how to track user touch input. And we shall make our Player track the touch.
To track touch input, we shall override onTouchEvent(event: MotionEvent) method in GameView Class. And with the introduction of Player.kt to GameView. Following is the updated GameView.kt file.
GameView.kt
package com.tutorialkart.examplegame

import android.content.Context
import android.graphics.BitmapFactory
import android.graphics.Canvas
import android.util.AttributeSet
import android.view.MotionEvent
import android.view.SurfaceView
import android.view.SurfaceHolder

/**
 * GameView is our playground.
 */

class GameView(context: Context, attributes: AttributeSet) : SurfaceView(context, attributes), SurfaceHolder.Callback {
    private val thread: GameThread
    private var grenade: Grenade? = null
    private var player: Player? = null

    private var touched: Boolean = false
    private var touched_x: Int = 0
    private var touched_y: Int = 0

    init {

        // add callback
        holder.addCallback(this)

        // instantiate the game thread
        thread = GameThread(holder, this)
    }

    override fun surfaceCreated(surfaceHolder: SurfaceHolder) {
        // game objects
        grenade = Grenade(BitmapFactory.decodeResource(resources, R.drawable.grenade))

        // start the game thread
        thread.setRunning(true)
        thread.start()
    }

    override fun surfaceChanged(surfaceHolder: SurfaceHolder, i: Int, i1: Int, i2: Int) {

    }

    override fun surfaceDestroyed(surfaceHolder: SurfaceHolder) {
        var retry = true
        while (retry) {
            try {
                thread.setRunning(false)
                thread.join()
            } catch (e: Exception) {
                e.printStackTrace()
            }

            retry = false
        }
    }

    /**
     * Function to update the positions of sprites
     */
    fun update() {
        grenade!!.update()
        if(touched) {
            player!!.update(touched_x, touched_y)
        }
    }

    /**
     * Everything that has to be drawn on Canvas
     */
    override fun draw(canvas: Canvas) {
        super.draw(canvas)

        grenade!!.draw(canvas)
        player!!.draw(canvas)
    }

    override fun onTouchEvent(event: MotionEvent): Boolean {
        // when ever there is a touch on the screen,
        // we can get the position of touch
        // which we may use it for tracking some of the game objects
        touched_x = event.x.toInt()
        touched_y = event.y.toInt()

        val action = event.action
        when (action) {
            MotionEvent.ACTION_DOWN -> touched = true
            MotionEvent.ACTION_MOVE -> touched = true
            MotionEvent.ACTION_UP -> touched = false
            MotionEvent.ACTION_CANCEL -> touched = false
            MotionEvent.ACTION_OUTSIDE -> touched = false
        }
        return true
    }

}
Run the application and you will observe that the circle (Player bitmap), shall track your touch.
Conclusion
In this Kotlin Android Tutorial, we have built a Game in Android using Kotlin.
There are many other techniques that we could learn to use in Android Game Development. In our subsequent Kotlin Android Tutorials, we shall learn some of them and make our Game awesome, or you may use them to make your Game Script come to life. Happy coding Android.