Assigning a Sales Office to a Sales Area in SAP is a vital step in configuring the Sales and Distribution (SD) module. This configuration ensures seamless integration between the organizational units, enabling effective sales operations. Follow this detailed tutorial to learn the step-by-step process for assigning a Sales Office to a Sales Area in SAP.
Why Assign Sales Office to Sales Area in SAP?
The Sales Office is responsible for sales activities in a specific geographical region or business area. A Sales Area combines a Sales Organization, Distribution Channel, and Division. Linking a Sales Office to a Sales Area allows SAP to:
- Establish a clear connection between sales operations and their assigned geographical or business scope.
- Enable data consistency for customer orders, pricing, and distribution.
- Streamline reporting and operational workflows.
Step-by-Step Process for Assignment
You can assign a Sales Office to a Sales Area using the following navigation method:
- Transaction Code:
SPRO - Menu Path:
SPRO > SAP Customizing Implementation Guide > Enterprise Structure > Assignment > Sales & Distribution > Assign Sales Office to Sales Area
Step 1: Open SAP Customizing (SPRO)
- Log in to SAP.
- In the Command Field, type
SPROand press Enter. Image Description:- The image shows the SAP Command Field with the transaction code
SPROentered to access the SAP Customizing menu. - It highlights where the user needs to type the code.

- The image shows the SAP Command Field with the transaction code
Step 2: Access SAP Reference IMG
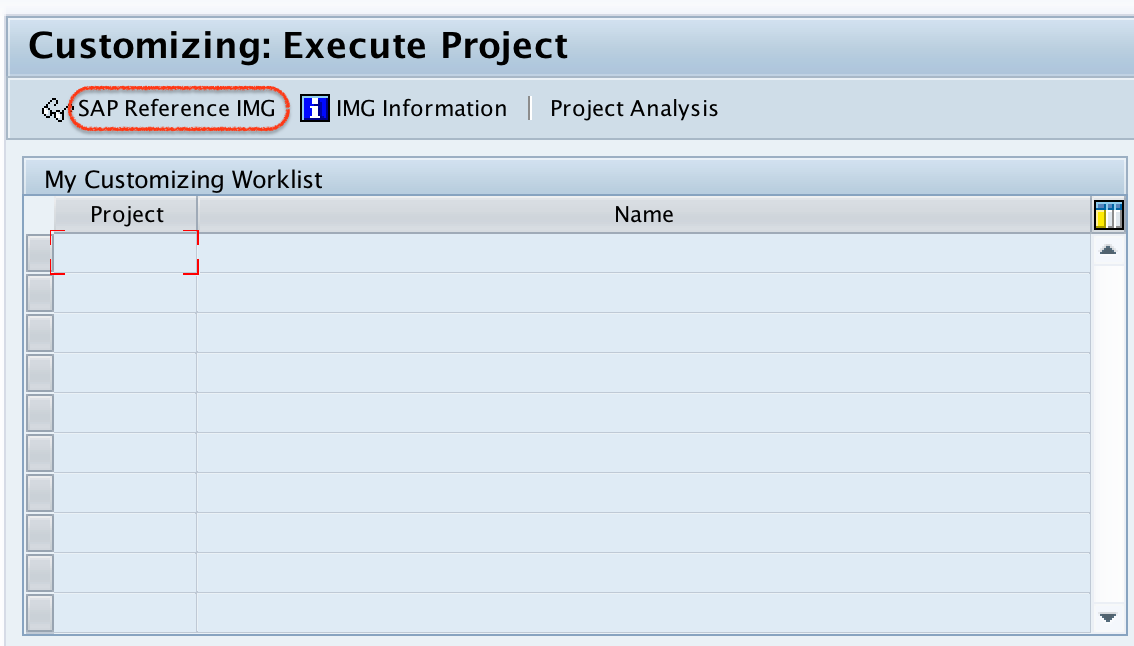
- On the Execute Project screen, double-click SAP Reference IMG. Image Description:
- The image displays the “SAP Reference IMG” button highlighted, indicating where to click to proceed.

Step 3: Navigate to the Assignment Option
- Follow this path:
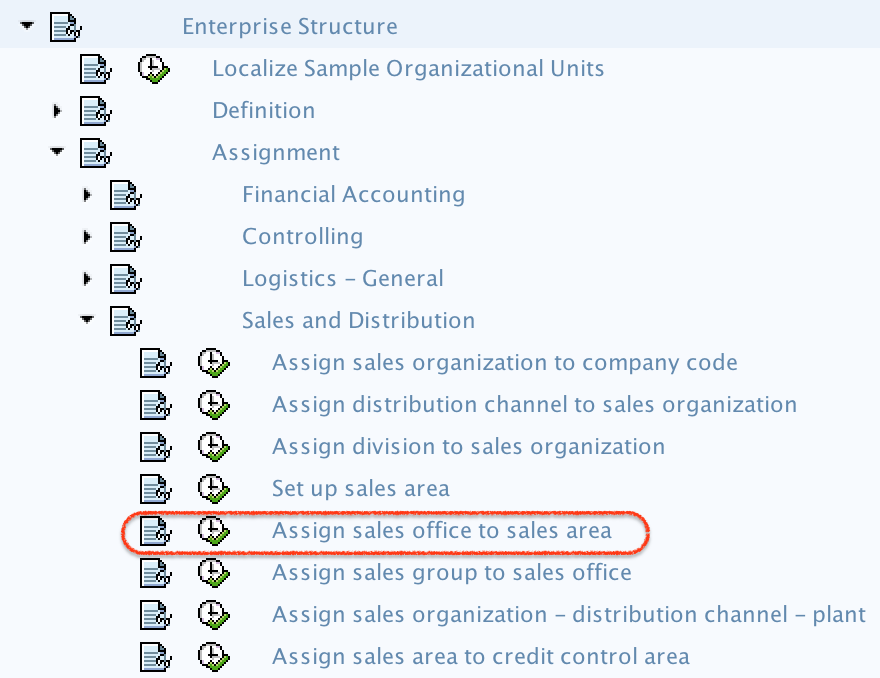
Enterprise Structure > Assignment > Sales & Distribution > Assign Sales Office to Sales Area - Select the option Assign Sales Office to Sales Area. Image Description:
- The screen highlights the exact menu path to locate the assignment option.
- The “Assign Sales Office to Sales Area” option is clearly marked for user convenience.

Step 4: Access the Assignment Screen
- On the Change View: Assignments Sales Office – Sales Area Overview screen:
- Click the New Entries button to add a new assignment.
- The image focuses on the “New Entries” button, guiding users to begin the assignment configuration.

Step 5: Enter Assignment Details
- On the New Entries screen, update the following details:
- SOrg (Sales Organization): Enter the Sales Organization key for assignment.
- Dchl (Distribution Channel): Enter the Distribution Channel key for assignment.
- Dv (Division): Enter the Division key for assignment.
- SOff (Sales Office): Enter the Sales Office key for assignment.
- The image showcases the “New Entries” screen with fields for Sales Organization, Distribution Channel, Division, and Sales Office.
- Example values are entered to demonstrate how the configuration looks.

Step 6: Save the Assignment
- After entering the details, press the Save button.
- When prompted for a Customizing Request, select the appropriate request and confirm. Image Description:
- This image highlights the save confirmation process with the “Customizing Request” pop-up.
- It ensures users understand how to finalize the assignment.

Final Verification
Once saved, the assignment of the Sales Office to the Sales Area is complete. You can verify this configuration by reviewing the overview screen or testing it through sales transactions.
Summary
Assigning a Sales Office to a Sales Area in SAP ensures operational efficiency and data accuracy across sales processes. This configuration step is vital for connecting organizational structures with business workflows, allowing for effective management and reporting.
If you found this guide helpful, explore more SAP tutorials:
Let us know if you need more assistance or have questions!
